前提条件
- Python 的开发环境
- MCP 主机(我使用的是 Cherry Studio)
注意事项
根据实现的 MCP Server 的类型不同,做日志功能时需要注意:
- 对于 stdio 类型:不要把日志打印到标准输出,如
- 在 Python 中不要使用 print(),但可以将输出定向到 sys.stderr
- 在 JavaScript 中不要使用 console.log()
- 在 Go 中不要使用 fmt.Println()
- 类似在其它语言中,向标准输出写入的语法或方法
- 对于 HTTP-based 类型:标准输出作为日志记录是没有问题
IMPORTANT!!!:Use a logging library that writes to stderr or files.
设置开发环境
我使用 conda 作为虚拟环境工具,并且使用 uv 作为包管理工具。
这里绕了一下,因为我不想在全局安装 uv 工具,不然总是要手动维护 uv 的版本。
1
2
3
4
5
6
7
| $ conda create -n learn-mcp
$ conda activate learn-mcp
(learn-mcp) $ conda install conda-forge::uv
(learn-mcp) $ uv init weather
Initialized project `weather` at `/your/path/to/weather`
(learn-mcp) $ source .venv/bin/activate
(weather) (learn-mcp) $ uv add "mcp[cli]" httpx
|
uv add “mcp[cli]” httpx 时,一定要保证你的 Python 版本大于 3.10。
编码
第一步,必然是先实例化一个 MCP 实例:
1
2
3
| from mcp.server.fastmcp import FastMCP
mcp = FastMCP("天气服务")
|
然后,编写一个使用 httpx 包发送 GET 请求的帮助方法:
1
2
3
4
5
6
7
8
9
10
11
12
13
14
15
16
| async def make_request(url: str) -> dict[str, Any] | None:
"""发送 GET 请求并返回 JSON 响应
Args:
url (str): 请求 URL
Returns:
dict[str, Any] | None: JSON 响应数据或 None(请求失败)
"""
try:
async with httpx.AsyncClient() as client:
response = await client.get(url)
response.raise_for_status()
return response.json()
except Exception:
return None
|
接着,使用装饰器函数定义一个工具:
1
2
3
4
5
6
7
8
9
10
11
12
13
14
15
16
17
18
19
20
21
22
23
24
25
26
27
28
29
30
31
32
33
34
35
36
| weather_url = "https://uapis.cn/api/v1/misc/weather"
@mcp.tool()
async def get_current_weather(city: str) -> str:
"""获取城市实时天气
Args:
city (str): 城市名称
Returns:
str: 城市实时天气及穿着、出行建议
"""
params = {
"city": city,
"extended": "true",
"indices": "true",
}
query_str = "&".join([f"{key}={params[key]}" for key in params.keys()])
data = await make_request(f"{weather_url}?{query_str}")
if not data:
return "获取天气失败"
return f"""{data["province"]}{data["city"]}实时天气
天气:{data["weather"]}
温度:{data["temperature"]}℃
风向:{data["wind_direction"]}
风力:{data["wind_power"]}级
湿度:{data["humidity"]}%
紫外线:{data["life_indices"]["uv"]["advice"]}
穿着建议:{data["life_indices"]["clothing"]["advice"]}
出行建议:{data["life_indices"]["car_wash"]["advice"]}
"""
|
上述代码的逻辑简单,只做两件事:1. 发送请求获取结果;2. 解析结果并返回。
最后,加上运行代码,手动执行即可:
1
2
| def main():
mcp.run(transport="streamable-http")
|
1
2
3
4
5
| $ python weather.py
INFO: Started server process [12609]
INFO: Waiting for application startup.
INFO: Application startup complete.
INFO: Uvicorn running on http://127.0.0.1:8000 (Press CTRL+C to quit)
|
配置及问答
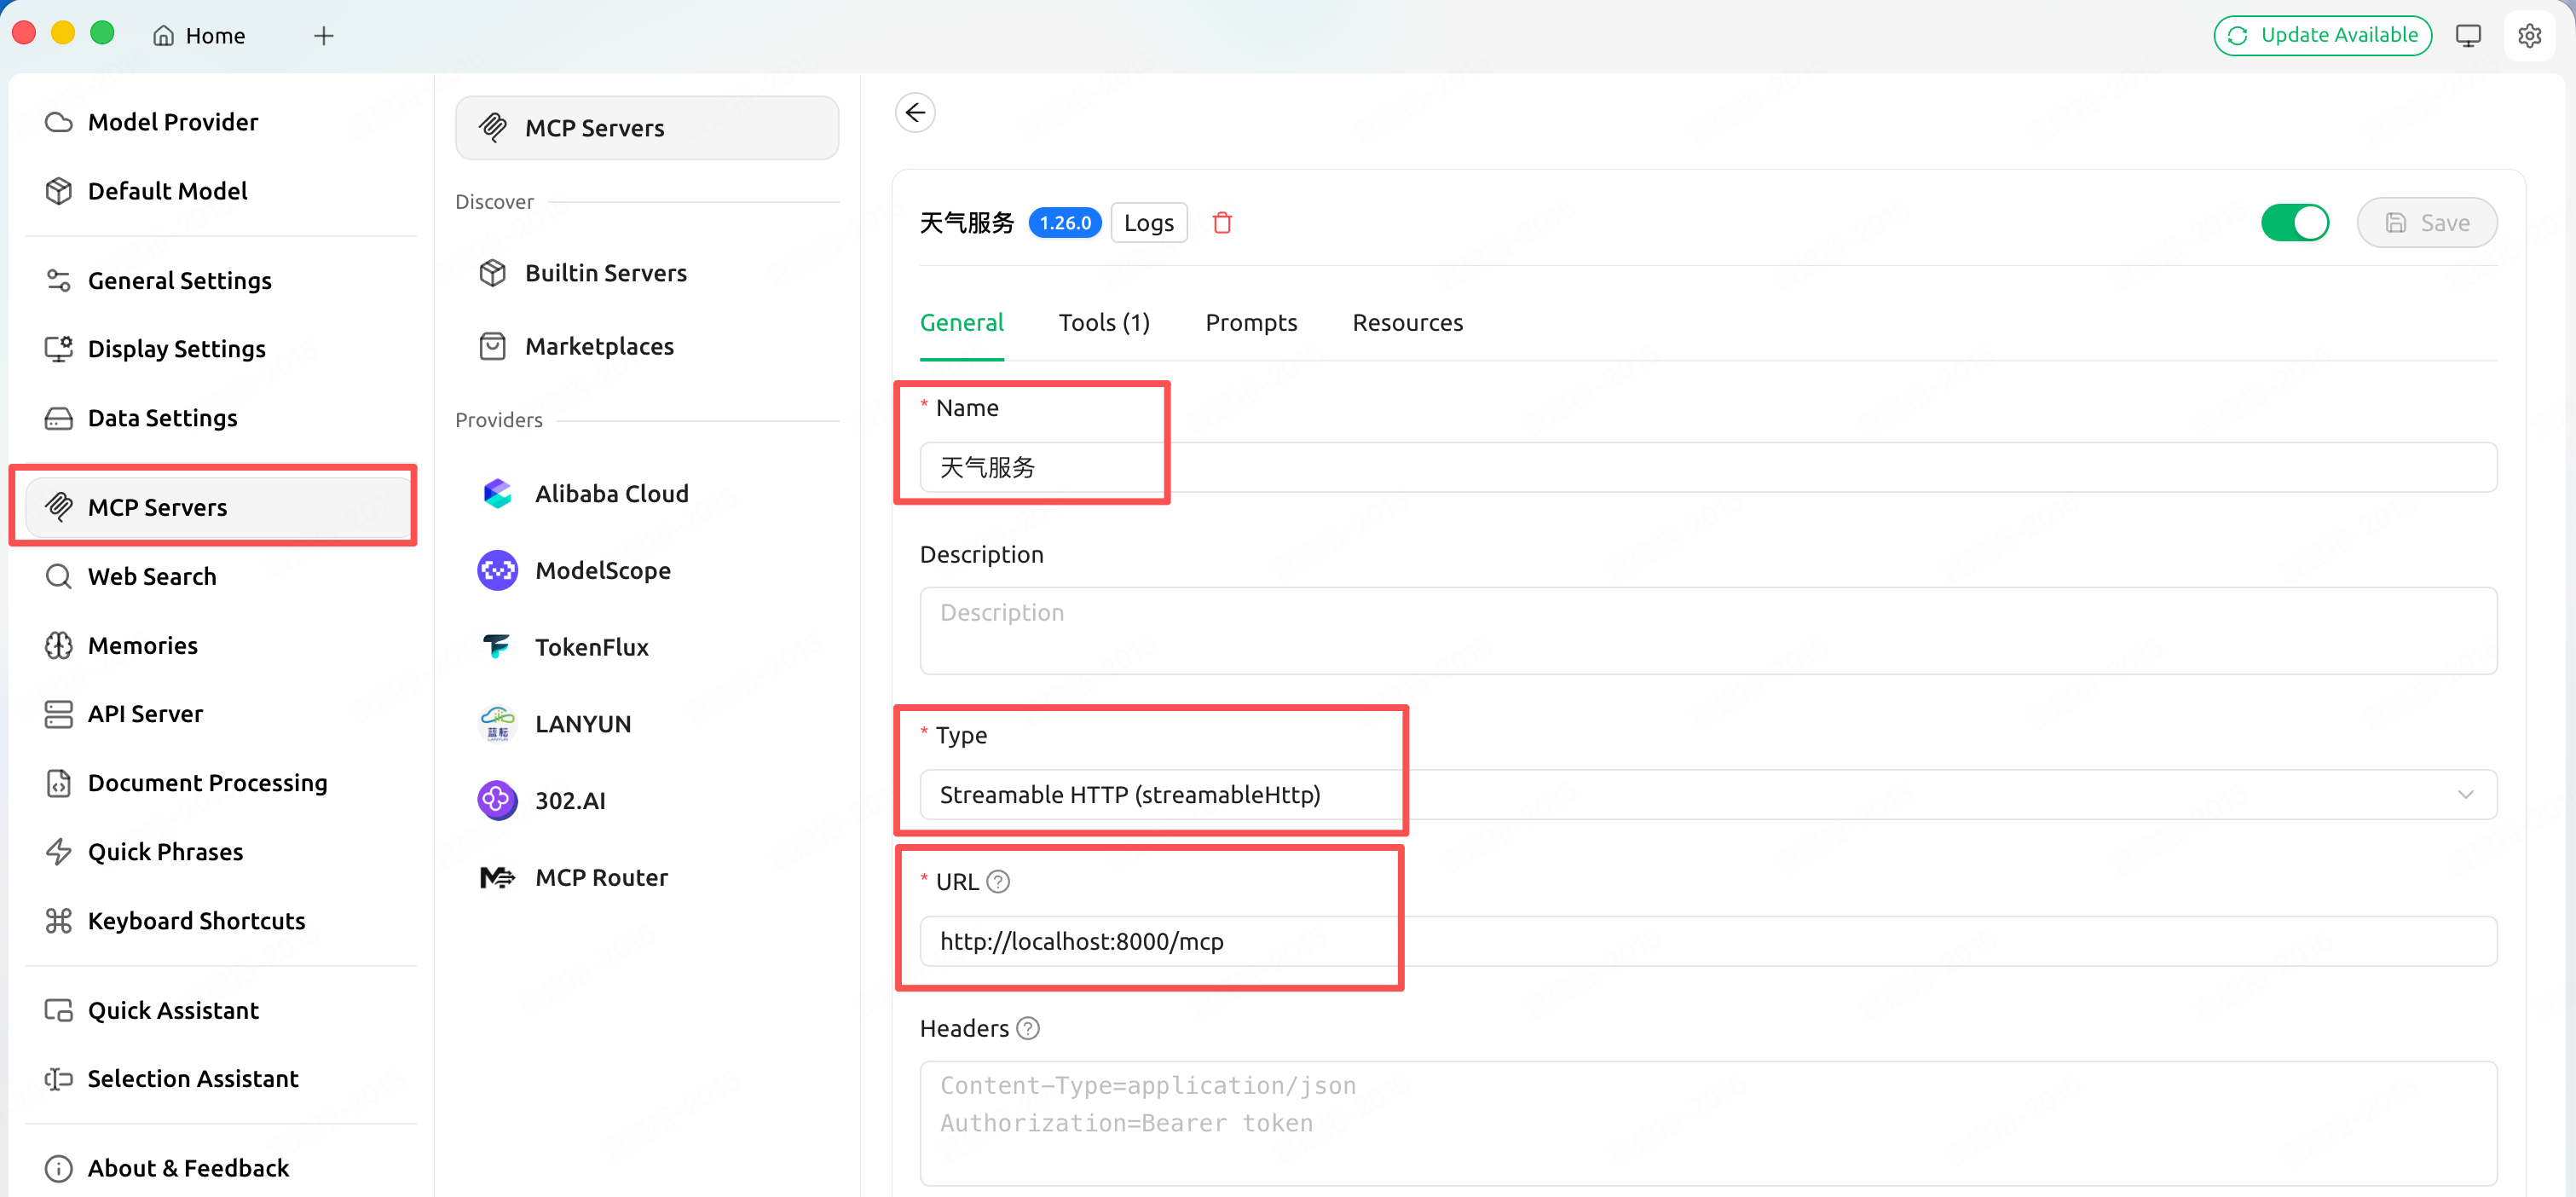
在 Cherry Studio 的配置中添加 MCP Server 信息,如下图:

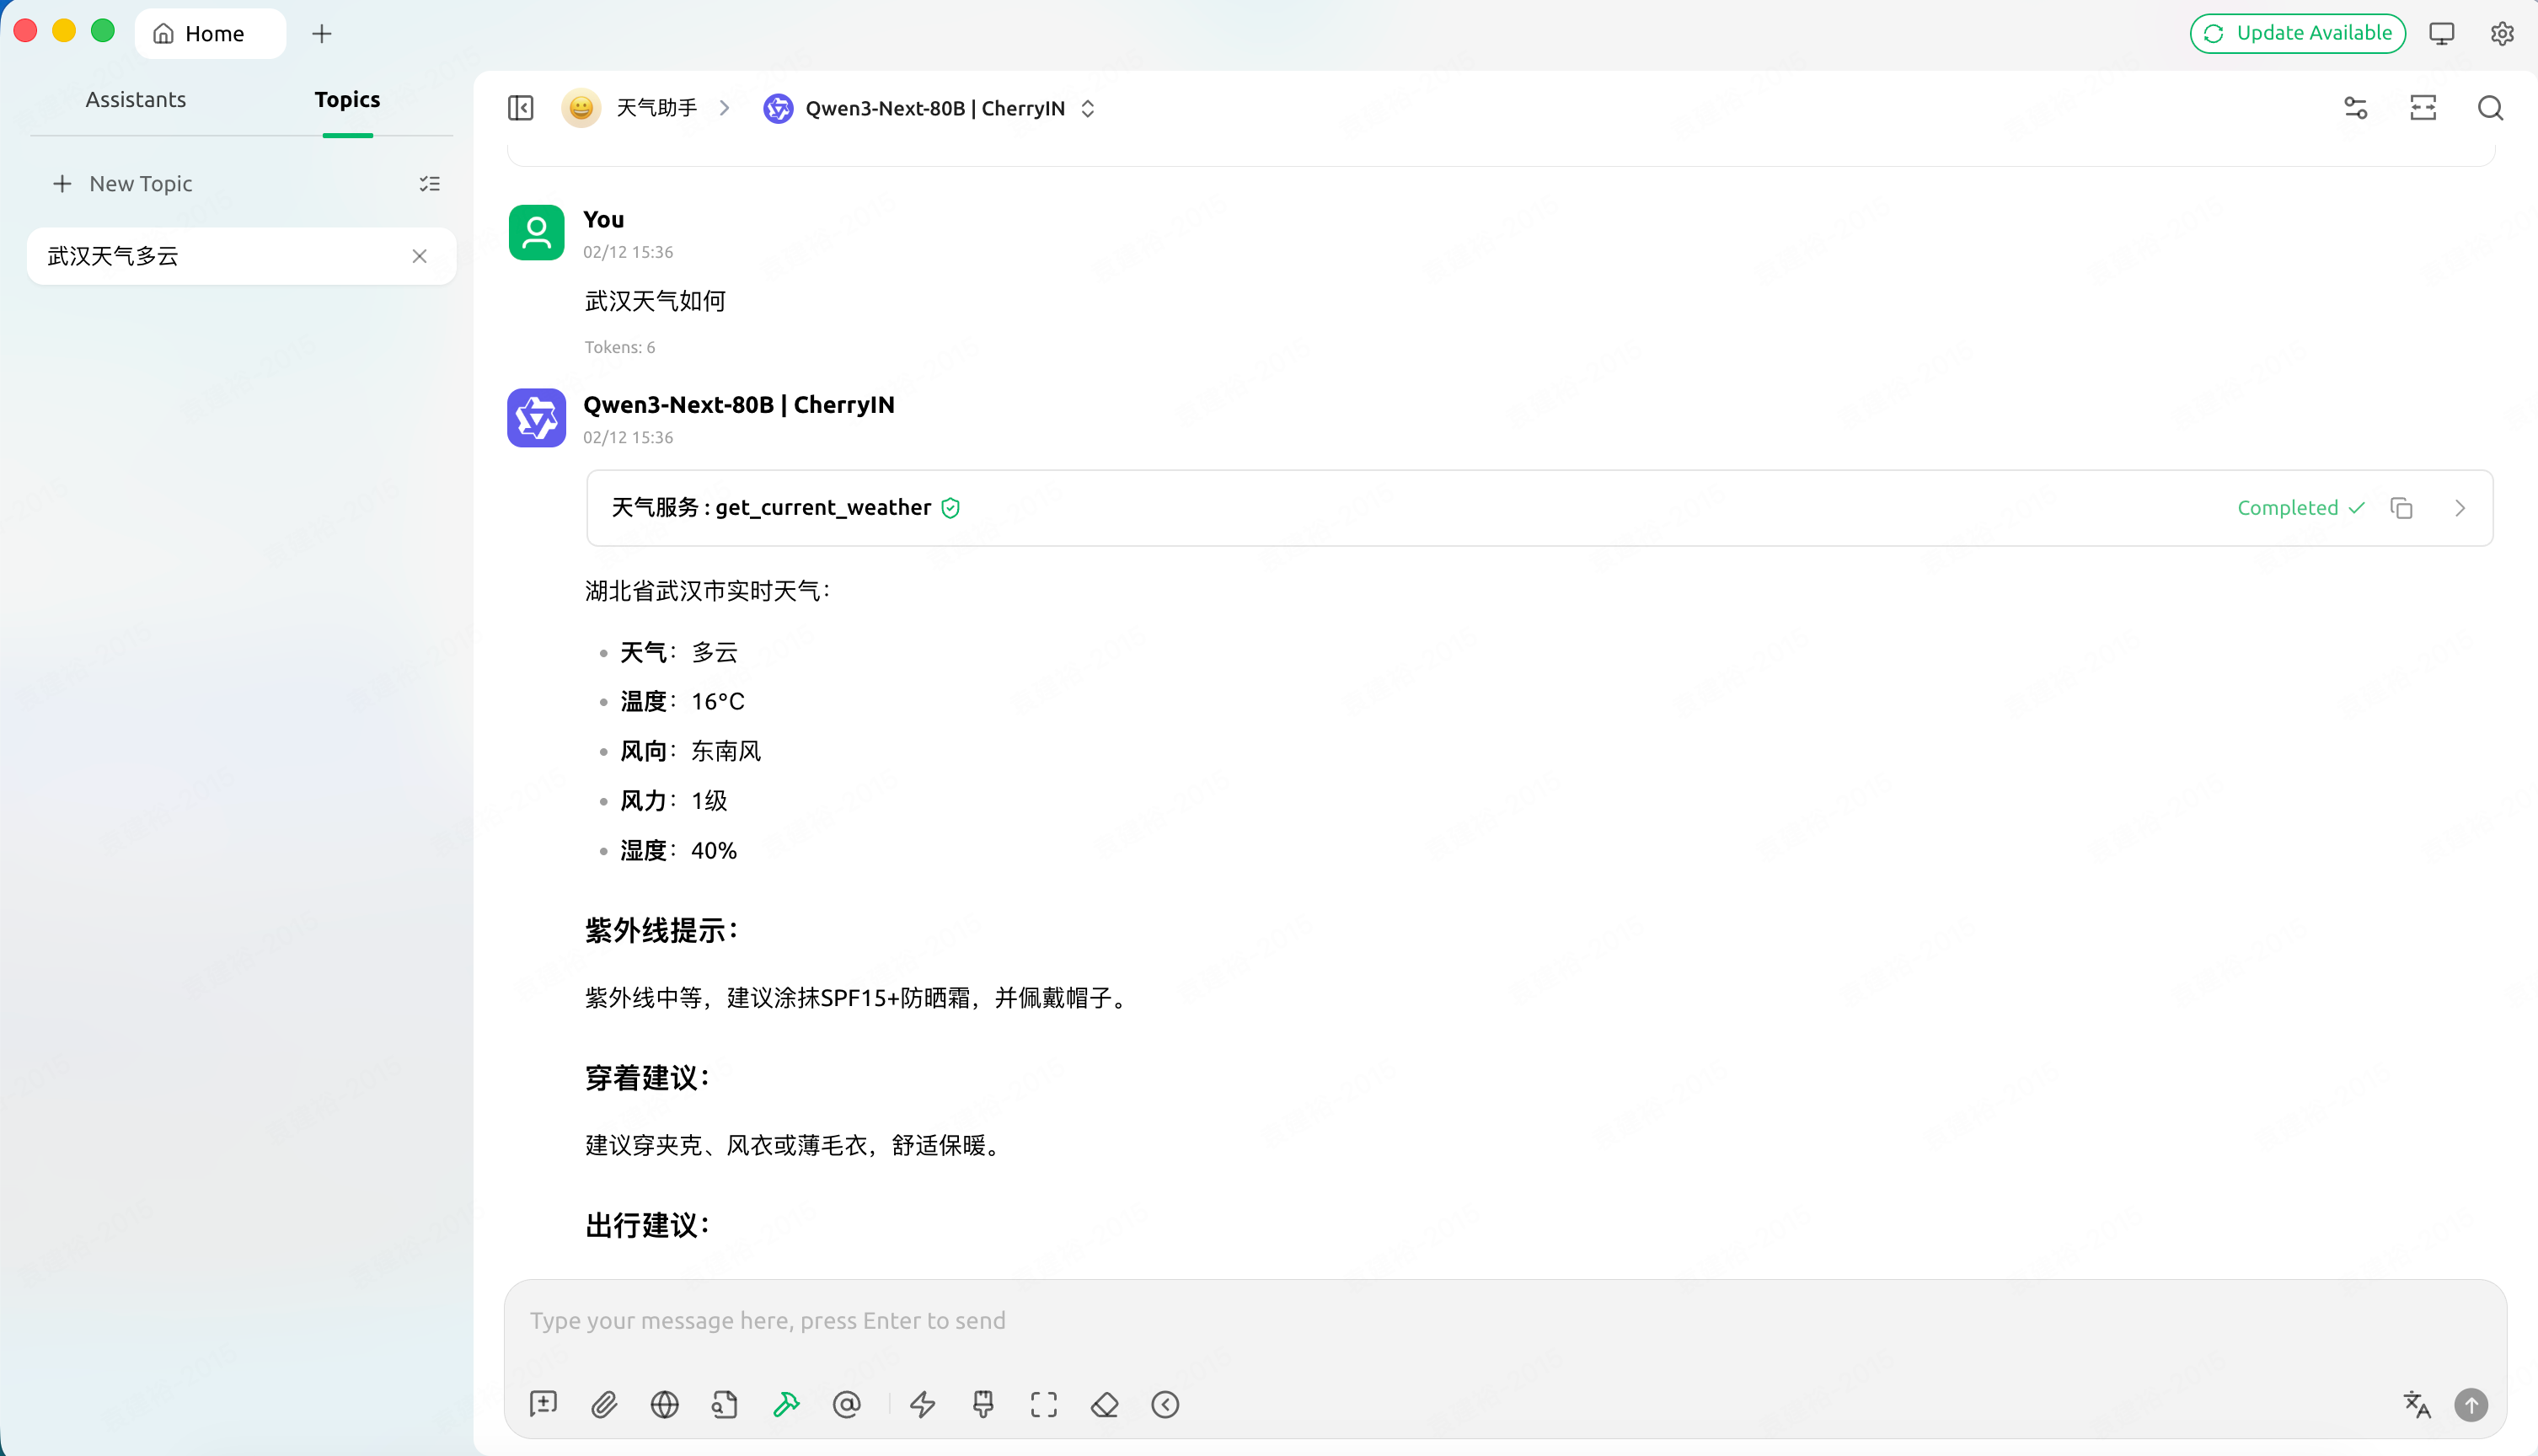
在创建助手时,选择此 MCP Server,然后进行问答,如下图:
完整代码
1
2
3
4
5
6
7
8
9
10
11
12
13
14
15
16
17
18
19
20
21
22
23
24
25
26
27
28
29
30
31
32
33
34
35
36
37
38
39
40
41
42
43
44
45
46
47
48
49
50
51
52
53
54
55
56
57
58
59
60
61
62
63
64
65
66
67
68
69
70
| from typing import Any
import httpx
from mcp.server.fastmcp import FastMCP

mcp = FastMCP("天气服务")
async def make_request(url: str) -> dict[str, Any] | None:
    """发送 GET 请求并返回 JSON 响应

    Args:
        url (str): 请求 URL

    Returns:
        dict[str, Any] | None: JSON 响应数据或 None(请求失败)
    """
    try:
        async with httpx.AsyncClient() as client:
            response = await client.get(url)
            response.raise_for_status()
            return response.json()
    except Exception:
        return None
weather_url = "https://uapis.cn/api/v1/misc/weather"


@mcp.tool()
async def get_current_weather(city: str) -> str:
    """获取城市实时天气

    Args:
        city (str): 城市名称

    Returns:
        str: 城市实时天气及穿着、出行建议
    """

    params = {
        "city": city,
        "extended": "true",
        "indices": "true",
    }
    query_str = "&".join([f"{key}={params[key]}" for key in params.keys()])
    data = await make_request(f"{weather_url}?{query_str}")
    if not data:
        return "获取天气失败"

    return f"""{data["province"]}{data["city"]}实时天气

天气:{data["weather"]}
温度:{data["temperature"]}℃
风向:{data["wind_direction"]}
风力:{data["wind_power"]}级
湿度:{data["humidity"]}%

紫外线:{data["life_indices"]["uv"]["advice"]}
穿着建议:{data["life_indices"]["clothing"]["advice"]}
出行建议:{data["life_indices"]["car_wash"]["advice"]}
"""
def main():
    mcp.run(transport="streamable-http")
if __name__ == "__main__":
main()
|